Ads 468x60px

  • First Lesson

    7/31/2010 was my first lesson. This is when i embarked on my new found love and hobby. I began to fly regularly after that first flight. I have found a new passion that was a childhood passion of mine!

  • Solo Time

    July 4th 2011 was my first solo. I flew at Oxnard Airport. All three landings were awesome, and increased my confidence more than i could ever explain. The first solo will stick with me for the rest of my life!!! It was a turning point in my hobby!

  • Still Learning, Striving, and Flying

    It has been a long journey, and an expensive on as well. But i stuck to it and keep flying as i am now so fascinated by it. I strive to learn more, and now i understand a pilots license is a license to learn!

Friday, October 7, 2011

ADF Navigation

ADF (A.K.A Auto Direction Finder) is a simple concept and has a simple operation.  It consist of the radio signals in low to medium frequency band of the spectrum.  Usually 190 - 1750 Khz.  It has a HUGE advantage over VOR's.  This is the reception.  It has a signal that follows the curvature of the earth, and is not limited like VOR's to just a few hundred miles at best.  

The distance depends on the amount of power that is supplied to the beacon.  It can receive on both AM radio station and NDB commercial AM radio stations that broadcast on 540 - 1620 Khz.  Non-Directional Beacon operates in the frequency of 190 - 535 Khz.


COMPONENTS

ADF Receiver : You can tune the station desired, and select the mode of operation. The signal is received, amplified, and converted to audible voice or Morse code and powers the bearing indicator.


Control Box (Digital Readout Type) : Most newer aircraft have this in the cockpit . The frequency tuned is displayed as digital readout. ADF automatically determines the bearing to the selected station and displays it on the RMI.

Antenna : The ADF needs two antennas. The two antennas are called the LOOP antenna and the SENSE antenna. The ADF receives signals on both the loop and the sense antennas. The loop antenna consist of several coils spaced at various angles. The loop antenna sense the direction of the station by the strength of the signal on each coil, but cannot however determine whether the bearing is TO or FROM the station. The sense antenna provides this latter information.

Bearing Indicator : displays the bearing to station relative to the nose of the aircraft. Relative Bearing is the angle formed by the line drawn through the center line of the aircraft and a line drawn from the aircraft to the radio station. Magnetic Bearing is the angle formed by a line drawn from aircraft to the radio station and a line drawn from the aircraft to magnetic north (Bearing to station). Magnetic Bearing = Magnetic Heading + Relative Bearing.


TYPE OF ADF INDICATOR
Four types of ADF indicators are in use today. In every case, the needle points to the navigation beacon.Those four types are:

Fixed Compass Card : It is fixed to the face of instrument and cannot rotate. 0 degree is always straight up as the nose of aircraft.


The relationship of the aircraft to the station is refered to as " bearing to the station " MB or aircraft to magnetic north. This type of indicator, pilot must calculate for the bearing by formula: MB = RB + MH


Rotatable Compass Card : The dial face of the instrument can be rotated by a knob. By rotating the card such that the Magnetic Heading (MH) of the aircraft is adjusted to be under the pointer at the top of the card.


The bearing to station (MB) can be read directly from the compass card without calculation and makes it easy for the pilot. Today, they have designed automatic rotating compass cards to agree with the magnetic heading (MH) of the aircraft . Thus MB to station can be read at any time without manually rotating the compass card on the ADF face.


Single-Needle Radio Magnetic Indicator : Radio Magnetic Indicator is an instrument that combines radio and magnetic information to provide continuous heading, bearing, and radial information.


The face of the single needle RMI is similar to that of the rotatable card ADF.


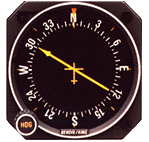
Dual-Needle Radio Magnetic Indicator : The dual needle RMI is similar to single needle RMI except that it has a second needle. The first needle indicates just like a single needle. In the picture , the yellow needle is a single which indicate the Magnetic Bearing to the NDB station . The second needle is the green needle in the picture. (Still looks yellow, but pointing roughly 014 degree)

The second needle (green) is point to VOR station .The dual needle indicator is useful in locating the location of an aircraft.

OPERATION

ADF operates in the low and medium frequency bands. NDB frequency and identification information may be obtained from aeronautical charts and Airport Facility Directory. The ADF has automatic direction seeking qualities which result in the bearing indicator always pointing to the station to which it is tuned. The easiest and perhaps the most common method of using ADF , is to "home" to the station . Since the ADF pointer always points to the station , the pilot can simply head the airplane so that the pointer is on the 0 (zero) degree or nose position when using a fixed card ADF . The station will be directly ahead of the airplane. Since there is almost always some wind at altitude and you will be allowing for drif, meaning that your heading will be different from your track. Off track , if the aircraft is left of track, the head of the needle will point right of the nose. If the aircraft is right of track, the head of the needle will point left of the nose.

For fixed compass cards, you must use the formular MB = MH + RB to find out what degree the ADF pointer should be on. Today , the fixed card indicators is very unsatisfactory for every day use , but can still be found on aircraft panels. 

For rotatable compass cards, it has huge advantages over the fixed card indicators. The pilot can rotate the compass card with the heading knob to display the aircraft MH "straight up" . Then the ADF needle will directly indicate the magnetic bearing to the NDB station.

For Single needle Radio Magnetic Indicator , the compass card is a directional gyro and it rotates automatically as the aircraft turns and provide continuous heading information. It accurately indicates the magnetic heading and the magnetic bearing to the beacon.

For dual needle Radio Magnetic Indicator, this gives the pilot the same information as the single needle indicator; such as aircraft heading and magnetic bearing to the NDB . The seacond indicator will point to a VOR station . This helps the pilot to check the location of the aircraft at that time.

Wednesday, October 5, 2011

Hood Work / Unusual Attitudes / Class C Airport Operations

Saturday was the day to complete more requirements.  I arrived at the airport at 3:45 and the weather was beautiful.  No clouds in the sky.  The wind was a little strong but not more than i or the plane could handle.  I walked into Pentastar and met mike there.  We went into the conference room to start and discuss what we were going to do.  We would start out with some pattern work at Burbank, and then finish with some hood work, unusual attitudes, and VOR work.  This is all easy enough.  He briefed me on Class C operations and had me get Clearance Delivery freq just in case they made us land instead of staying in the pattern. 

We had 29 Gallons of fuel.  Enough for some practice, and reserve.  Since we would be burning roughly 9 gallons per hour.  I did my preflight inspection and run up and we were soon off for a right crosswind departure.  I already had the burbank tower freq in my standby when we departed.  So it was a quick switch over to them.  "Burbank tower, skyhawk 889er lima brave, just out of van nuys, request pattern if able".  They cleared me for the option, left base, runway 33.  So it was roughly 90 degree to the left of us.  So we turned towards the runway.  We came in a little high, and had one hell of a cross wind, wing down, and opposite rudder.  We touched down hard, but mike immediately said "Good Landing, Perfect". As he raised the flaps and i put in full power, we took back off and he mentioned again that it was a good landing.  He said yes, it was hard, but the wind was strong, and that is what is needed, to get it on the ground, and keep it there.

"889er lima bravo, make right base runway 26".  So they are having us doing a figure 8.  This is sort of cool.  So we get cleared for the option for 26.  Upon taking off you can not really go cross wind, as there is a MOUNTAIN right in front of you.  So you need to go a climbing turn while turning towards the threshold of runway 33.  This is a difficult airport at first, because we could not do a normal pattern, where you go downwind parallel the runway, and reduce power at the threshold.  So it takes some thinking and steady control, to judge the distance above the ground and to the runway.  You sort of have to "wing" it.  But it turned out perfect.  Mike even commented on how the pattern was thrown in the trash, but i was still able to fly it correctly and safely.  I also did a decent job on judging the distances.

We land and it was more of a headwind then a cross wind on runway 26, so we touched down really slow.  But it was a nice stead slope and we touched down nice and slow.  Awesome landing.  Mike raises the flaps, and i apply full power, and we take back off.  Once in the air tower tells us to make left base runway 33.  So we get to pattern altitude, and we are cleared for the option.  So we come in and do another cross wind landing, this one was very similar to the last one.  We touched on upwind side first, then downwind side, then nose wheel.  Mike is pretty confident now.  It was a little sorter than the last, but crosswind landings are hard to get down soft.  Since the plane is sort of falling on to the other wheel.  Mike raises the flaps, and i apply full power, and we take off.  Again we get cleared for the option, right base runway 26.

While getting over there, mike said he was happy with the pattern and my operations in the airspace.  He told me after landing to request a straight out departure, and we would go over to the practice area.  We come in for a touch and go on runway 26, and we do another really good landing.  Landings are a second nature now.  I have done them so many times, it's all natural now.  Im amazed at how far i have come in a short amount of time.  Upon takeoff i request a straight out departure, and as expected they handed me off to SoCal Departure.  So we take up flight following and start to our 4500' altitude.  Mike then tells me as we are climbing to put on the hood.


So i say Your controls, he confirms, and then i repeat.  I release the controls and grab the hood and put in on, and get it situated.  I then take the controls, and continue the climb up to altitude.  At 4400' i start to level off to slow our ascent and then level off at 4500'.  The whole time i was doing the instrument scan.  Trying to keep us on the exact same heading, and stay on altitude.  There was a stiff wind out so it was a little difficult to keep us on the same heading, but i was able to do it, by flying slightly into the wind, and using the ground track magenta diamond as the reference in the G1000 glass cockpit.  It seemed like it took us an hour to get out to the practice area, not being able to see anything outside, and just flying by reference to instruments.  Once we got out there, Mike then briefed me on unusual attitudes.  He mainly emphasized one point.  ROLL THE WINGS LEVEL, before pulling out of a dive, or pushing out of a nose high climb.  Easy enough.

Mike then tells me to close my eyes and tell him when i think we go into a left or right hand turn.  It takes a second, but i can sense a left turn.  So i say left turn.  Then he says, tell him when i think we are climbing, or descending.  Again it takes a second, but i then say, climbing turn.  He says wow.  Your good.  Then he says tell him when i think we are level.  I can feel the plane come down and level out.  I told him level.  He said WOW.  Ok.  He then says what do you feel.  I feel a dip to the left, and what seems like a descent, i say left descent, and he tells me to open my eyes.  I do, and i see us left wing down, but right rudder to keep us level.  He talks about it for a second, and asks if i read all this, which i have, so i told him yes.  He was just making sure, and showing me how easy it is to get confused by relying on senses in IMC, or IFR conditions.

He then tells me to close my eyes again.  I do, and i feel a roller coaster.  Up,  Down,  Left,  Speed up, Speed Down, Skid, Slip, then i hear, "Your Controls".  I look and we are in a dive, with wings fairly level but not completely.  So i quickly level the wings, pull back power, and pull up to get us into a level attitude.  Then i add power to re-establish level flight.  Then he asks for the controls back.  I give him controls and close my eyes.  Again.  A roller coaster.  For about 45 Seconds.  Then i hear again "Your Controls".  I look, and we are 30-45 degree turn up in the air.  So level the wings, add power, and pitch down to level flight.  Pull back power, once established, and we are back to level flight.  Again, i give mike the controls, and once again roller coaster.  After about 30 seconds, i hear again "Your Controls".  I look, and we are at a 30-40 degree turn pitched down, and gaining speed really quick.  I pull back power, as i level the wings.  Then pull up not too quick, but quickly so that we can bleed off the airspeed that has built up.  Again back to level flight.   Mike was happy with that.  So now he asked me to tune FIM vor.  He took my sectional that get me the correct frequency.

I put it the frequency, and he asked to track some inbound and outbound radials.  He wanted to make sure for inbound radials i used the reciprocal of the current radial we were on, and wanted to make sure i could get onto the course and track it with little to no deviation.  Then he wanted me to intercept a bunch of radials, and then he was happy with my flying.  The whole time i keep us right on altitude.  By making standard rate turns.  That is what made it easy to not over-bank, and to stay at a constant nice easy bank.  It was well within PTS limits.  I was pretty happy with the whole time.  During the VOR we had a discussion of outbound and inbound radials, as that is what my previous post VOR NAVIGATION is all about.

We start to go back to Van Nuys.  But mike does not give me headings.  He wants to see me get back still under the hood.  I put in KVNY as direct to on the g1000, and boom.  I have a line to follow.  So i follow the line, and close to the airport mike tells me to take the hood off.  I do so, and come back to a HECTIC pattern at Van Nuys.  We got told to keep straight at best possible speed, until told by ATC.  This was because there was a bunch of traffic, and he were vectored out of the way for some jets.  I'm perfectly fine with that.  But soon we are getting right to the edge of Burbanks airspace, but i still cant turn as im not sure if the traffic is next to me, and we can not get a radio call in.  Within 10 seconds we are in Burbanks airspace.  By then Mike chimes in quickly "Tower, uhhh niner lima bravo is IN BURBANKS AIRSPACE".  The controller comes back and says "Ohh yea niner lima bravo, reverse course, and cleared to land 34 left.".  I guess he forgot about us.  Mike said we would talk about that when we got back to the airport.

We did a quick 180 as i wanted to get out of burbank and quickly.  We came in for a landing, and it was a SWEET landing.  There was a bit of a crosswind, so it made it a little bit more difficult, but fun at the same time.  I have done so many landings, that the crosswind landings, add a bit of SPICE to it.  We touched on the upwind wheel then the other, then the nose wheel, and turn off at the reverse high speed taxiway exit.  We taxied back to pentastar, and shut her down and put her to sleep for the night.  We went into the conference room at pentastar, and did out debriefing.

All in all it was an awesome fight.  Mike liked it.  Talked to me about the check-ride, and setting the date for it, and a few other things.  He said he thought it was ready, just need to "tighten the screws a bit to fine tune".  He likes how in front of the airplane i am.  I have steady graceful movements and i lead in when i am suppose to.  He also talked about what happened with the controller.  He said that if we would have went any further, maybe call Burbank and tell them we were vectored into their airspace, and we just wanted to let them know, or if we did get questioned, mention what happened with the controller.  He clearly told us to keep straight, and we did.  We could not get a word in edge wise.  We had really no option due to the controller not telling us where the traffic was, and don't want to turn and hit someone.  So we were sort of forced to break into burbank without clearance.  I guess sometimes stuff happens.  I can see how it would be easy to bust into airspace, if you are NOT using a g1000.  It would be hard to thread the needle between airspace.

Saturday, October 1, 2011

VOR Navigation


We want to have a way while in the sky, to navigate and get to our location successfully.  At the same time we also need to know how to find out where we are, if we are lost.  There are many ways to do both of these.  But in this discussion we will be talking about VOR's.  Included with VOR's are sometimes DME, which will give additional information based on the VOR's.  

To start with, the first thing we need to understand about Very High Frequency Omnidirectional Range Station is simple. When describing this radial or that radial, we need to remember that there are only FROM radials. Once we understand that, we start to understand VOR navigation more in depth.

VOR's allow you to fly TO them; by flying to the outbound radial on the other side of the station. The radial you are on while flying TO the station is still an outbound radial. This is where one needs to understand the reciprocal; or in other words the "opposite of". For example if you are on the 180° radial, you are on the 180° radial FROM the station, with no direction of flight implied. The reciprocal of 180° is 360° (+2/-2 rule). This is our heading TO the station.

The +2/-2 rule helps you to get the reciprocal of a radial easily, in MOST cases. It works like this. If you are on the 180° radial and want to turn to the reciprocal of 180°, you would add 2 to the first number and subtract 2 from the second number, and carry the third number down. So add 2 to the 1 from 180°, and this makes it 3. Then subtract 2 from the 8 in 180°, and this gives you 6. Carry down the 0 from 180°. So that would give you 360°. This DOESN'T ALWAYS WORK, but in most cases it will. If it doesn't, use common sense to find the answer. An example where it will not work is 010°. The reciprocal would be 290° using the +2/-2 rule. This is incorrect and it should be 190°. But if you use common sense and think 010° is close to 360°. The reciprocal of 360° is 180°. Add the additional 10° from the 010° to 180° and it gives you 190°. You can see how this will help you along your way.

So to reiterate, if you are on the 057° heading FROM the station, to fly TO the station you would again use the +2/-2 rule and you would fly the reciprocal of 057°, or 237° radial (The radial on the other side of 057°). Why do people have problems with VOR tracking and navigation? Because they do not get the concept that, there are NO TO RADIALS. They need to remember there are ONLY FROM RADIALS. The VOR has the radials that extend FROM the station. Once this is ingrained into your head, you will not have problems with navigation any longer.

A VOR tells you where you are and where your destination is. The OBI (Omni Bearing Indicator)gauge on your panel, has two parts: CDI & OBS. The Course Direction Indicator is the needle and the Omnibearing Selector is a knob for turning to the various headings as indicted at the top or bottom (depends on manufacturer) of the OBI. Let's assume our OBI shows the radial we are on at the top of the gauge and the reciprocal heading at the bottom. We only have to concern ourselves with the radial we are on (our position) for now.

If we are flying on a 270° heading, and we tune the FROM radial of a VOR, with a centered OBS needle and it shows 180°. We know we are on the 180° radial heading 270°. If DME is included, we now know our distance from the station. We know that 180° is south of the station, so we now know 360° TO the station. We turn to the right to 360° TO the station, still on the 180° radial FROM the station.
So we want to fly is on the R-270 45 DME.  So we know 270° is to the left since we are flying to the North.  As we get close to the station, the needle will become VERY sensitive to heading changes.  At this point we need to NOT CHASE THE NEEDLE, but fly a constant heading while in this "cone of confusion".  This sensitivity, stems from the passage over the station.  At this point we would shortly thereafter receive an OFF indication to signal we are over the station.

Before we can use an intercept procedure, we must decide which radial to intercept and whether we are going to intercept the radial inbound or outbound. If the radial is an airway, this must be determined from a chart.
  1. tune the OBI to the station and audio identify
  2. to intercept and fly outbound, rotate the OBS to set the radial under the course index;
    to fly inbound on the radial, turn the OBS to set the reciprocal of the radial under the course index.
  3. confirm that TO/FROM indicator is consistent with intentions;
    i.e., if flying inbound, TO should read with reciprocal set in OBI.
    It should show FROM with the outbound radial set.
    Having confirmed the TO/FROM indicator is consistent with your intention, continue to Step 4. NOTE: The TO/FROM indicator does not show whether you are tracking TO or FROM the station; it only shows whether or not the course you have chosen will take you TO or FROM the station, IF INTERCEPTED AND IF FLOWN!
  4. If the Course Deviation Indicator [CDI] is to the left, SUBTRACT an appropriate intercept angle (usually between 40° & 60°) from the course set under the index in the OBI dial.
    If the CDI needle is right, ADD an appropriate intercept angle to the course shown in the OBI. Refer to the Directional Gyro [D.G.] and turn left/right, which ever distance [angle] is shorter [less]. Remember, we are turning to intercept a radial we determined as being our inbound or outbound heading to our destination [Step 2].
  5. When the CDI needle centers, the intercept is accomplished and the aircraft should be turned [heading] to the course set in OBI; i.e., the course selected to be flown.
NOTE: Often, when flying inbound to intercept a given radial, pilots reach the station before the intercept. This happens when an insufficient intercept angle is flown. To make sure the angle flown will intercept the station before arrival, use the following procedure:
  • Rotate the OBS from the course being intercepted to the intercept heading [in the D.G.] being flown. If the CDI needle reverses, the intercept will occur before the station passage; if not, then station passage will occur first, UNLESS a larger intercept angle is used.
So now we would put in 270° in the OBS. We determined earlier this would be a turn to the left so immediately past the station, we would initiate a 15° bank toward the intended direction (left turn in this instance since we are turning from 360° to 270°). We turn to our intended heading plus an "intercept amount". We need this extra bit so that we re intercept the radial, and not just fly parallel to it outbound. We would turn to any angle in addition to the 270°.  Common practice, would be to turn 30° more or fly to a heading of 240° after the station passage.

With our OBI set at 270° and flying a heading of 240°, we would intercept the radial outbound within 10-15 miles. As the needle starts to come back to the center, adjust the heading closer to 270° to put us directly on the radial flying 270° FROM the station. It is now just a matter of reading the DME and adjusting our altitude to bring us to our destination. That's all there is to it: fly to the station and after passage turn to a heading that will allow interception of the outbound radial.

VOR's can also be used for time checks. This is a nifty trick that i was tough. It will let you know how long it will take to get to the VOR from where you currently are:

  • While inbound to the station on the 022° radial, you would need to start with an easy number. So we would use the 030° radial to start our check. We would turn to a heading of 120°, which is at right angles to the 030° radial. The OBS is turned to 030° and as the needle centers, we note the time. Immediately we rotate the OBS to 040°, which is the next radial to be used in the time check. We countinue to fly the 120° heading and flies to the 040° radial. As we cross this radial and the needle centers, we note the time and finds that it has taken two minutes (60 seconds) to make the 10° radial change.

The formula for determining the time remaining to the station is:

(TIME IN SECONDS BETWEEN RADIAL CHANGE)/(DEGREES OF RADIAL CHANGE) equals TIME TO STATION IN MINUTES.

Therefore, by dividing 60 seconds by 10, we now know we have 6 minutes remaining to fly to the station. Although this problem can be worked out using any degree of radial change, l0° of radial change is the simplest and fastest to figure out in my opinion.

VOR's can also be used to find your location if you are lost.  This is another nifty trick with the VOR's that will locate you within minutes if you are lost.  

  • Find 2 VOR's that are close to the last know location, or the general area you believe you are around.
  • Tune in the first VOR and rotate the OBS until you get a FROM indication and a centered needle.
    • Draw a line coming out of that VOR on the heading that the centered needle is on, on your sectional.
  • Tune into the second VOR and rotate the OBS until you get a FROM indication and a centered needle.
    • Draw a line coming out of that VOR on the heading that the centered needle is on, on your sectional.
  • These 2 lines should intersect at some point.  This is the point where your airplane is located, or very close to.
  • At this point you should look for landmarks, outside, and on the sectional.  Try to reestablish your position.  Once you know where you are, continue on course.